donderdag 24 januari 2013

Paris je t'aime

It has been quite a while ago when my boyfriend & me had an amazing time in Paris. I was planning to write about it, but never quite got to it. Now I finally have some time to write about the great places we discovered in Paris!

At first, we had a great apartment! It was in the middle of the Quartier Latin (34 Rue de la Montagne), very close to the Panthéon. Behind big doors there was a courtyard with several apartments and a dojo on it. The apartment on the courtyard was a beautiful, quiet place, in the middle of a big, noisy city. It was small, but had enough space for the two of us, and the interior was very nice.

The first few days we went around walking and by subway, but than we took the Vélib Bikes, which was much better! Vélib is bike-sharing with 1800 bike stations located every 300 metres. There's always a bike station somewhere close (although sometimes you do need to search quite a bit untill you've found it).


We are real foodies, so good food & wine is about the most important thing when we're travelling.
We went to a few real good places in Paris, that I would absolutely recommend.

Crêpes à Gogo (12, Rue Soufflot) is, obviously, a restaurant for crêpes. The restaurant is not very fancy, but it's very busy and the crêpes are good. We went there for breakfast. They had all sorts of crêpes with (almost) all the toppings you can think of. For less than € 30 we had a real good breakfast for two.

L'Agrume (15, Rue des Fossés St-Marcel) is a very nice restaurant, with a good 'menu of the chef'. We sat on the bar, where we could enjoy looking at the cook preparing the meals. The staff is very friendly, the food very good. Through this restaurant we also came to know about a great restaurant in The Netherlands, that's owned by one of their former interns. This very young girl, Estée Strooker, started her own awesome restaurant 't Amusement in Arnhem. Okay, this post is about Paris, but 't Amusement is an absolute must-go when you're somewhere near Arnhem!! Great ambiance, very good price-quality ratio, very good and original dishes. Back to Paris...

La Pré Verre (8, Rue Thénard) is a great restaurant in Quartier Latin. We went there on our first day in Paris, sat on their terrace, and had a beautiful set lunch menu. It included two courses, a glass of wine and a coffee. All of that for only € 13,50 per person! This is a real good price, because the food was absolutely amazing!

Au Dernier Métro (70, Boulevard de Grenelle) is a bistro serving Basque (South-West of France) food. This place is also used as a bar, so it can be very packed. We had to wait about 45 minutes to be seated, but enjoyed every minute of it. There are lot's of locals going to this place.


Bistrot du Sommelier (97, Bd Haussmann) is a restaurant that's run by sommelier Philippe Faure-Brac. We went to a special event that's held every Friday. We had a lunch with five wines of one winehouse. The owner of the winehouse was also there, to tell us something about the wines. We had this lunch in the cellar underneath the restaurant itself, and sat all together (about 15-20 people) on a big table. It seems to be a very social event where wine-lovers meet. We don't speak French, I think it's more fun if you do speak French. At the same time it's not very touristy. It was mostly a special experience.


Angelina is a tearoom that has several branches in Paris. We went to the one on 226, Rue de Rivoli. They have all sort of beautiful sweet things. It is expensive, and the interior is quite old-fashioned. So we took out one beautiful little tartlet and ate it in the Jardin des Tuileries, which is right on the opposite of the road. The tartlet looked amazing and it was very yummy!


Around the corner from our apartment, there was a little cheese-shop with lots of different cheeses! It's called Laurent Dubois and they have two sites in Paris. We had a taste here and there, and also bought some cheese for lunch!


Because I design jewelry, I love to stroll around bead shops. Unfortunately I only went into two in Paris, my boyfriend wouldn't let me go into more ;). One of these two is really nice. This is Matière Première (12, Rue de Sévigné). I could look around in this shop for hours (and probably I did, haha).


Also we went to the Marche aux Puces St-Ouen de Clignancourt. It's said to be the biggest flea market in the world. When you go there, you take the subway to Porte de Clignancourt. Skip the first stands with fake brand clothing and other rubbish. On the market they have all kinds of stuff, from furniture and books, to clothes, jewelry and house wares. I loved to stroll around here.


Last but not least I want to share with you this very cool store. It's a kind of supermarket, but with only deep-frozen food! I've never seen anything like this before! They had lots and lots of food, from ingredients, to starters and main courses to desserts, and all kind of pies. Everything from simple food, to very luxurious food. I can't remember where it was, or what the name was, but maybe someone else will know...


Some of the photos on this post aren't made by me, so thanks to the photographers :)

Below some other random photo's of Paris, that are made by me!


woensdag 12 december 2012

DIY Snowflake Christmas Decoration

Yesterday I made this very cool decoration!


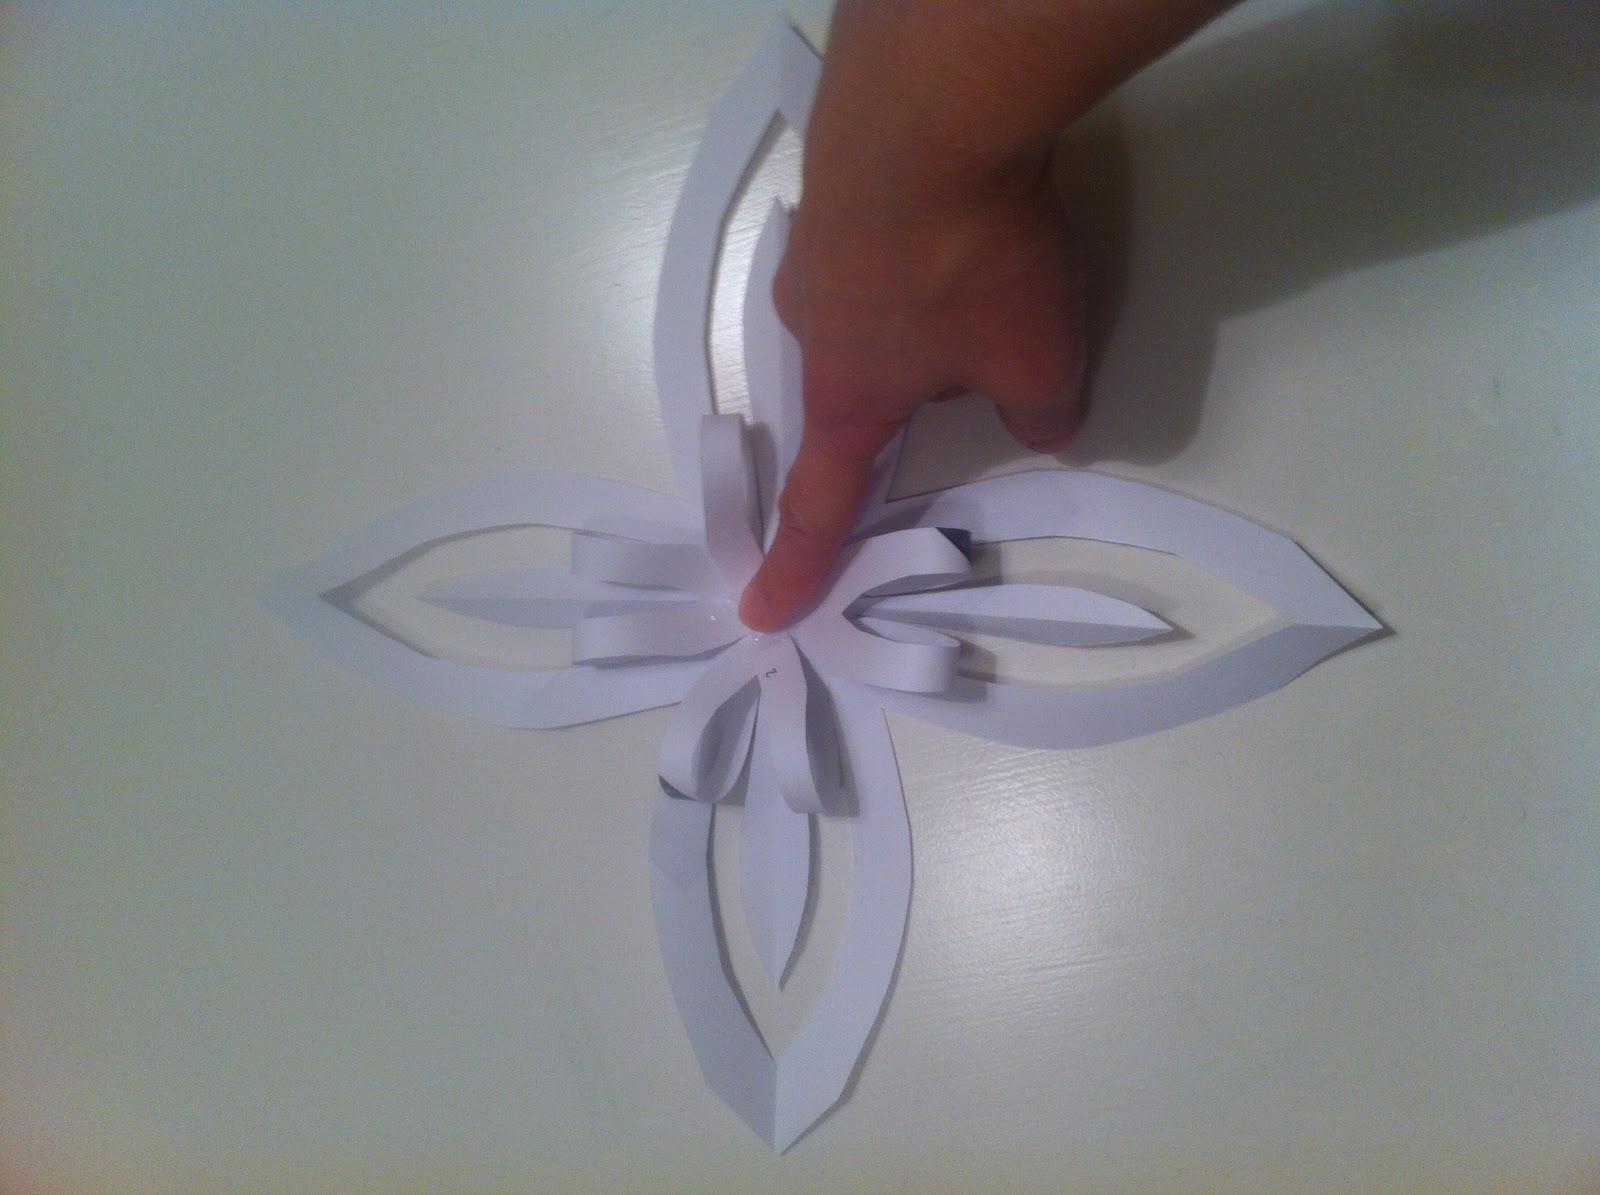
I saw it on the Handimania Facebookpage, so I thought I'd give it a try. Because the Handimania one doesn't have a real good description, I hereby give a step-by-step description. It might look difficult, but it's actually not!

1. Make a square of a A4 piece paper, I use old misprints that I always keep to make my shoppinglist on.


2. Fold the square in two, for three times. 


3. Cut the corner of using scissors.


If you open it, you'll cut out this:


4. Cut two round shapes from the side, almost until the end of the paper.


If you fold it open once, it looks like this:


5. Fold it completely open.


6. Glue the middle parts of the leaves to the middle of the figure.


7. Take another piece of paper to make another figure of the same. Don't bother if they are not exactly the same, because some imperfection makes it even more beautiful!


8. Put the first figure on top of the second figure, and glue them together in the middle.


9. Now take the middle parts of the leaves of the bottom figure and glue them on the top figure towards the middle (see pictures).


 Done! Now I have two figures, I put them on the wall using masking tape, and it looks so nice!!


dinsdag 20 november 2012

Yummy Shake!

Today I made this delicious & healthy shake that I want to share with you!

What you need for two glasses of this shake:
- about 5 oranges
- 1 banana
- about 15 dates
- a big splash of butter milk
- a little bit of honey

Press the oranges so they'll become orange juice.
Put all the ingredients and the orange juice together in a food processor, let them mix for a while and your delicious shake is ready!

I use a food processor, but I'm sure it'll also work in a blender. If your shake is to thick, ad a bit of butter milk or orange juice. Also always tast your shake before serving it, that way you can add something to make the taste absolutely perfect!

woensdag 31 oktober 2012

DIY - Christmas Decoration

As promised, a post about how to fold your own christmas decoration with the DIY package of Quiero!  They will be for sale soon at the Hubshop and my webshop, and Sunday 4 November for sale at my stall at the Diezijn Leuk Markt in Groningen.

Zoals beloofd, een bericht over hoe je je eigen kerstbal/-decoratie kan vouwen met je zelfmaak-pakket van Quiero! Binnenkort te koop bij de Hubshop en mijn webshop, en Zondag 4 November zijn ze te koop bij mijn kraam op de Diezijn Leuk Markt in Groningen.

I will write this post both in English and in Dutch, so that everyone who'll buy the package wil be able to understand.

Ik zal dit bericht, zoals je kunt zien, zowel in het Engels, als in het Nederlands schrijven, zodat iedereen die mijn zelfmaak-pakketje heeft gekocht het kan begrijpen.

In your package will be a either a template which you can use to make the decorations from any kind of paper you'd like, or one or more ready-to-use papers. When you have bought the package with the template, you'll need to transfer it to paper first.

In je pakketje zit ofwel een sjabloon, waarmee je zelf deze leuke decoratie kan maken van welk papier je maar wil, of wel een kant-en-klaar papier dat je direct in elkaar kunt vouwen. Als je het sjabloon hebt gekocht, moet je het patroon eerst overnemen op het door jou gewenste papier.

In the package there are two paper shapes, one slightly bigger than the other.

In het pakketje zitten twee papieren vormen, eentje is net iets groter dan de ander.


1. Fold the paper to the inside over all the black lines. You might wanna use something to get it really sharp, I use the plastic handle of my scissors for example.

1. Vouw het papier naar binnen toe over alle lijnen. Het is handig om een voorwerp te gebruiken om de vouwen echt scherp te maken, ik gebruik hiervoor het plastic handvat van mijn schaar.


It should like this on the blank side, when you're finished folding:

Als je klaar bent met het vouwen van alle lijnen, zou het er aan de lege kant zo uit moeten zien:


2. Cut the paper on all the dotted lines.

2. Knip het papier in over alle stippellijnen.


When you're finished cutting, it should look like this:

Als je over alle stippellijnen hebt ingeknipt, ziet het er zo uit:


3. Put some glue on all the numbered triangles. You can use all kinds of glue, like a glue-stick or photo-glue. Just use whatever you have.

3. Doe wat lijm op alle genummerde vlakken. Het maakt niet zoveel uit wat voor een lijm je gebruikt, je kunt het bijvoorbeeld lijmen met een lijmstift of fotolijm. Gebruik gewoon wat je in huis hebt.


4. Put the bal together. The glued triangles should be attached to the triangles they were bordered on before you cut them.

4. Vouw de bal in elkaar. De gelijmde vlakken moeten vastgelijmd worden aan de vlakken waar ze voor het inknippen aan grensden.


One side of your ball is finished!

Eén kant van je bal is af!


Repeat above steps with the other part for the other side of you decoration!

Herhaal bovenstaande stappen met de andere vorm voor de andere kant van je decoratie!


8. Put the thread trough the needle and put it through the top of the biggest half.

8. Doe de draad door de naald en haal hem door de bovenkant van de grootste helft.


Put the needle back through the same hole. You will get a loop.

Haal de naald vervolgens weer terug door hetzelfde gaatje, zodat je een lus krijgt.


Put a little knot on top of the loop, to make sure the rope won't go back through the whole.

Maak bovenin de lus een klein knoopje, zodat je het touw niet per ongeluk weer eruit kunt trekken.


Put both ends of the threads trough the top of the other half. On this pictures I am going to put a bead on the bottom of the ball. In your package there might not be a bead. Then you can use a little bell on the bottom, in this case only put one of the thread ends through the bottom.

Haal vervolgens beiden eindjes door de bovenkant van de onderste helft. Op de foto's maak ik een kraal aan de onderkant van de bal vast. In jouw pakketje zit wellicht geen kraal. Je kunt dan een klein belletje aan de onderkant vast maken. Mocht je dit gaan doen, haal dan maar één van de eindjes door de onderkant.


Put a bead on it, and a knot underneath the bead, so the bead can't come off.
For the bell, put the bell on the one thread that's on the bottom, en than put the thread back through the hole again (similar as on the top side). Knot the threads on the inside of the ball.

Haal de twee draden door een kraal, en maak een knoop onder de kraal, zodat 'ie goed blijft zitten. Als je een belletje vast gaat maken, doe dan de ene draad die je door de onderkant gehaald hebt door het belletje, en haal die draad vervolgens weer terug naar de binnenkant van de bal (net als aan de bovenkant van de bal). Maak dan de draden aan elkaar vast met een knopje aan de binnenkant van de bal.


If you want to use your decoration to pack a present, make sure that you leave enough space between the knots, so the ball can still open.

Als je je zelfgemaakte decoratie wilt gebruiken om een cadeautje in te verpakken, zorg dan dat je genoeg ruimte houdt tussen de knopen, zodat de bal nog open kan.


Your decoration is ready! Slide the smaller half into the bigger half with a slightly turning movement (sorry the photo below was taken before I put the thread through the balls!).

Je decoratie is af! Doe de kleinere helft in de grotere helft met een licht draaiende beweging (sorry, onderstaande foto heb ik gemaakt voordat ik de draad door de ballen haalde!).


In the package there are some nice accessoires to decorate your christmas ball. But of course you can also use anything you have at home to make your ball truly unique!

In het pakketje zitten altijd wat leuke accessoires om je kerstbal te decoreren. Maar uiteraard kun je ook allerlei spulletjes die je in huis hebt gebruiken om je bal echt uniek te maken!

See my other post on this blog for some ideas on decorating your christmasball!

Zie mijn andere bericht op dit blog voor wat ideeën voor het decoreren van je kerstbal!